Engaging students: Defining the terms acute triangle, right triangle, and obtuse triangle

In my capstone class for future secondary math teachers, I ask my students to come up with ideas for engaging their students with different topics in the secondary mathematics curriculum. In other words, the point of the assignment was not to devise a full-blown lesson plan on this topic. Instead, I asked my students to think about three different ways of getting their students interested in the topic in the first place.

I plan to share some of the best of these ideas on this blog (after asking my students’ permission, of course).

This student submission again comes from my former student Brittney McCash. Her topic, from Geometry: defining the terms acute triangle, right triangle, and obtuse triangle.

green line

D2. How was this topic adopted by the mathematical community?

            As the students are walking into class, I will already have a picture of just a standard (acute) triangle on the board (be it Promethean or white). As class begins, I will pose the question of, “Who can tell me what we are looking at?” Of course, the students will tell me a triangle. I will then proceed to show two more triangles, an obtuse and then a right triangle and ask the same question. The answer will be the same for each. After I show all three, I will put a picture of all three together and ask the students what some of the differences are in each. Once we state the obvious (That there are angles of bigger and smaller sizes in each), I will then post a picture of Euclid. I will ask if anyone knows who this is. More than likely no one will. I will then proceed to tell my students that in 300 BC this man, Euclid, wrote a book called Elements. In this book. We had 4 sub books that consisted of mainly triangles. When telling this fact I will put emphasis on the word “whole” to show how insane that is. By now, the students should be in awe that someone could write so much about triangles. Then I would state that inside this book, Euclid proved that there were 3 different types of triangles. There is obtuse, right, and acute. We could then discuss as a class what we think each triangle presented at the beginning of class is just by sheer guess, and then see if they were right by then going into the actual discussion of the definition of each term. This is a fun and knowledgeable way to bring in some historical background of what they are learning. This shows that it’s just not going to go away, that it has been around for a while, and is still being thoroughly discussed in classrooms, like ours.

green line

A1. What interesting word problems using this topic can your students do now?

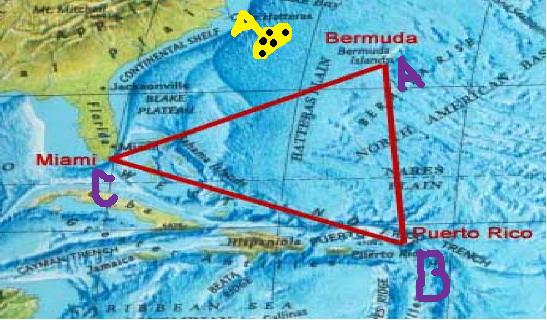
            An interesting topic that is still around today, is the Bermuda Triangle. After a brief introduction of the definition of an obtuse, right, and acute triangle, I will pose this problem: (There will be a picture of the Bermuda triangle with points labeled, (posted below).)

You are captain of the ship Euclid and are sailing straight for the Bermuda triangle. Hearing of all the bad things that can happen inside the “triangle,” you want to avoid it as best as you can. Luckily for you, you have a super power. You are able to shift one point of triangle wherever you would like. Using your super power and the knowledge of triangles we discussed previously in class, decide which point you would move, and into what triangle so that you can sail past smoothly. You will need to draw your final result with a justification of why you chose that triangle and point.

This question is not only engaging, but it makes them think abstractly. They have to use their knowledge of triangles and produce a result that fits our discussion. Then not only do they have to draw it, they will need to discuss it as well. Talking about why they chose the method they did, helps students retain and process the information better. Take into account, there are multiple ways to answer this question.
Bermuda


green line

B1. How can this topic be used in your students’ future courses in mathematics or science?

            Triangles are such a widely used topic, that it is almost guaranteed you will see them again. Not only will you use them later on in our course (Geometry), but you will be using them in pre-calculus and so forth. The main triangle you will work with in the future is the right triangle. That is why it is so important for you to learn the difference now between the triangles. Later, you will be discover the different ways you can solve for sides and angles with a right triangle, you will be discovering the different properties that come with each triangle, and how you can draw them using circles. But before you can do any of that, you have to start with the basics, like knowing which triangle is which and their definitions. I would then go in to explain that now only would triangles be used in classes, but in the real-world as well. They are everywhere we look, literally. Every time we look, we are looking at a specific angle. In the video games we play, we are always making decisions based off of the angles we can use, it’s how we build things; it’s everywhere! To have a basic understanding of something so usable in our world, would be essential to success!

Resources:

http://en.wikipedia.org/wiki/Triangle

http://www.livescience.com/23435-bermuda-triangle.html

Engaging students: Dilations

In my capstone class for future secondary math teachers, I ask my students to come up with ideas for engaging their students with different topics in the secondary mathematics curriculum. In other words, the point of the assignment was not to devise a full-blown lesson plan on this topic. Instead, I asked my students to think about three different ways of getting their students interested in the topic in the first place.

I plan to share some of the best of these ideas on this blog (after asking my students’ permission, of course).

This student submission again comes from my former student Candace Clary. Her topic, from Geometry: identifying dilations.

green lineHow could you as a teacher create an activity or project that involves your topic?

Dilations are types of transformation. One activity that I could create for my students is a matching game. I can create cards with index cards, or sheets of paper that have been cut up, that have pictures on them. Each one will be labeled and the students must classify them as dilations, why they are considered dilations, and how they were dilated. As a follow up to this activity, I could assign a topic to create their own city, or small town. They would be required to draw out their town, as well as model it using common crafts. After they do this, they will need to be able to dilate the buildings, and other such things, to make a life size city. They will not have to make the city with a model, but instead, they will need to make a blue print using their model in mind. On this blue print, they will need to inform me of the size of the dilations.

green lineHow can this topic be used in your students’ future courses in mathematics or science?

Dilations can be used in many different subjects. Dilations can be used to find sides of a triangle when learning about the triangle congruence theorems. These can be useful in algebra when finding side lengths of figures. This may not happen very often, but it is displayed in algebra. Another place that it will help, although it may not be math, it will help in math classes for architectural students, as well as help people in construction. Many science classes require science projects that work and simulate something real. Dilations can be used when making these projects because you can’t make a real river, but you can structure something that is a smaller figure to the real thing, same thing as a volcano. With architecture, dilations can help with making blue prints and can help in building these blue prints with dilations in mind. With construction, those are blue prints too. I’m not saying in order to build something you must know how to dilate something, but it will help tremendously.


green lineHow has this topic appeared in pop culture?

To get the students engaged in the topic, I could bring up the Disney channel movie ‘Honey I Shrunk The Kids.’ This will bring up a discussion with the kids when I ask them what the dad did with his shrink ray. Some ideas that may come up will be that he made them smaller, and then at the end of the movie he made then bigger, back to normal. But in the people were still the same people, they didn’t change, only the size did. At least I hope that is what happens in the discussion. I could then instruct the students into pretending that they had a shrink ray and ‘shrink’ some shapes, as well as other students. This activity, and their answers will be recorded on a chart that they will turn in at the end of class. They, themselves, can decide what size they want to shrink to, but they have to remember to bring the student back to normal at the end of class. I think this activity will be fun for the kids because they will never forget what a dilation is, since they have been ‘dilated’.

Engaging students: Finding the area of a right triangle

In my capstone class for future secondary math teachers, I ask my students to come up with ideas for engaging their students with different topics in the secondary mathematics curriculum. In other words, the point of the assignment was not to devise a full-blown lesson plan on this topic. Instead, I asked my students to think about three different ways of getting their students interested in the topic in the first place.

I plan to share some of the best of these ideas on this blog (after asking my students’ permission, of course).

This student submission again comes from my former student Andrew Wignall. His topic, from Geometry: finding the area of a right triangle.

green lineWhat interesting (i.e., uncontrived) word problems using this topic can your students do now? (You may find resources such as http://www.spacemath.nasa.gov to be very helpful in this regard; feel free to suggest others.)

To introduce the topic of the area of a right triangle early in a lesson, we can first examine the area of a rectangle, which students should already know how to do.

Say you have a large rectangular garden, 60 feet wide and 10 feet long. Home Depot sells sod (which is a pre-grown grass on a net that can be spread on the ground) at a rate of $3/square foot. What is the area of the garden, in square feet? How much sod should you order? How much would it cost to cover the entire garden with sod?

Instead of having the entire garden covered with sod, suppose you wanted to cover part of the garden with sod and leave the rest as soil for planting flowers. To make it more visually interesting, you decide to set the sod as a triangle? The sod triangle will have a base of 60 feet and a height of 10 feet. What is the area of this triangle in relation to the area of the entire garden? What is the area of this triangle? How much sod should you order? How much would it cost to cover the triangular area with sod?

Through this activity, we can investigate a relationship between right triangles and rectangles, and also the relation of the area of a triangle compared to the angle of a rectangle.

green line

How can technology (YouTube, Khan Academy [khanacademy.org], Vi Hart, Geometers Sketchpad, graphing calculators, etc.) be used to effectively engage students with this topic? Note: It’s not enough to say “such-and-such is a great website”; you need to explain in some detail why it’s a great website

One tool to show the area of a right triangle quickly and easily is the Area Tool on Illuminations (http://illuminations.nctm.org/Activity.aspx?id=3567). With trapezoids, parallelograms, and triangles available, you can click and drag the three vertices of a triangle and instantly see how the area is affected. You can create a quick table and keep a running tally of the base, height, and area, so you can recalculate in front of the class.

Illuminations has a sample lesson plan available online for discovering the area of triangles, and integrates this tool into the plan. If not using this tool as part of a similar plan, we must understand that this tool will not be great for introducing the lesson, as there is no button to lock onto a right triangle. However, there is a button to lock the height, so when you move the vertex opposite the base, you can see how the area does not change, see how the height can be outside the triangle, and extend the formula for the area of a right triangle to the area of any triangle. This tool can then be used in further lessons when discussing the area of parallelograms and trapezoids.


green lineHow can this topic be used in your students’ future courses in mathematics or science?

Since triangles are one of the most basic shapes, the area of triangles comes up time and time again. Triangles will also be used to find the area of more complex polygons, such as hexagons and irregular polygons, by breaking down complex shapes into simple triangles and quadrelaterals. Trigonometry uses right (and non-right) triangles extensively; in Precalculus, we will revisit the area of triangles, and learn how to find the area of triangles without explicitly being given the base and height.

Outside the classroom, the area of a triangle is used extensively in architecture, as triangles are strong, and triangular trusses and frames are used in many steel structures. As the inside empty area of the triangle increases, then the stress on the triangle increases, and architects must take this into consideration.

Triangles are also used in 3d computer graphics, as the 3d shapes they design actually consist of lots of little triangles, and they have to fit textures of a certain size (say 512 pixels x 512 pixels) onto a few triangles, so it is important that they know how and where for these textures to lie.


References

Math is Fun, “Activity: Garden Area”. http://www.mathsisfun.com/activity/garden-area.html

Illuminations: Resources for Teaching Math, “Discovering the Area Formula for Triangles”. http://illuminations.nctm.org/Lesson.aspx?id=1874

Illuminations: Resources for Teaching Math, “Area Tool”. http://illuminations.nctm.org/Activity.aspx?id=3567

Home Depot, http://www.homedepot.com/p/StarPro-Greens-Centipede-Southwest-Synthetic-Lawn-Grass-Turf-Sold-by-15-ft-W-rolls-x-Your-L-2-97-Sq-Ft-Equivalent-RGB7/202025213

Math is Fun, “Heron’s Formula”. http://www.mathsisfun.com/geometry/herons-formula.html

Maths in the City, “Most stable shape – triangle”. http://www.mathsinthecity.com/sites/most-stable-shape-triangle

Andre LaMothe, “Texture Mapping Mania”. http://archive.gamedev.net/archive/reference/articles/article852.html


Engaging students: Defining the terms perpendicular and parallel

In my capstone class for future secondary math teachers, I ask my students to come up with ideas for engaging their students with different topics in the secondary mathematics curriculum. In other words, the point of the assignment was not to devise a full-blown lesson plan on this topic. Instead, I asked my students to think about three different ways of getting their students interested in the topic in the first place.

I plan to share some of the best of these ideas on this blog (after asking my students’ permission, of course).

This student submission again comes from my former student Allison Metlzer. Her topic, from Geometry: defining the terms perpendicular and parallel.

green line

B1. How can this topic be used in your students’ future courses in mathematics or science?

The concepts of perpendicular and parallel will be implemented in many of my students’ future mathematics courses not only in high school, but also in college. In algebra, the students are asked to find the slope or the rate of change. In looking at the slope, students are asked to find if it’s parallel or perpendicular to another function’s slope.

In geometry, many shapes have properties that define them as having parallel or perpendicular sides (i.e. squares, rectangles, parallelograms, etc.). Also, in order to decide if triangles are similar, their corresponding sides must be parallel. In order to use the Pythagorean Theorem, the triangle must be right angled or have the two legs perpendicular to one another.

In calculus, students are asked to find orthogonal vectors which are also defined as perpendicular vectors. Also, calculus incorporates concepts from algebra and geometry which in turn, include parallel and perpendicular lines.

Therefore, many, if not all of my students’ future math courses will use the topics parallel and perpendicular. Thus, it would be important for me to teach them the two concepts correctly now so that there wouldn’t be any misconceptions in the future.


green line

C3. How has this topic appeared in the news?

One big thing the news talks about every two years is the Olympics. Using the concept of parallel and perpendicular, the constructions are made for all of the different events. Apparent examples of events incorporating parallel lines are track, speed skating, and swimming. The one I will focus on is swimming, namely because it is a very popular Olympic event and one of my favorites. Pictured below is an Olympic swimming pool of 8 lanes. Do the lanes appear to be parallel? Two things that are parallel are defined as never intersecting while also being continuously equidistant apart. One can clearly see the lanes of the pool never intersect. If they did, then the contestants could interfere with one another. Also, because the Olympics is a fair competition, the lanes are equidistant in order to give each contestant a fair and equal amount of room.

Because the Olympics is a well-known event featured in newspapers, articles, and on TV, the students will be able to understand this real world application of parallel and perpendicular.

pool

green line

E1. How can technology (YouTube, Khan Academy [khanacademy.org], Vi Hart, Geometers Sketchpad, graphing calculators, etc.) be used to effectively engage students with this topic?

Before I would play the video, https://www.youtube.com/watch?v=vnnwfcDcNlY, I would first ask the students to think of as many examples they can of parallel and perpendicular in the real world. After about a couple of minutes, I would tell them to keep those in mind and see if the video included any they didn’t think of. I would play the video from 1:25 to 3:05 which is the portion that displays all of the examples. It has clear pictures of recognizable objects which incorporate parallel or perpendicular lines. Also, the video has labels on the pictures to even more clearly describe where the components of parallel and perpendicular lines are. I believe that the initial brainstorm along with this video would get the students thinking about the importance of parallel and perpendicular lines. Also, I would make the connection that those examples would not be considered parallel or perpendicular unless they met the following definitions. Then I could explicitly define both parallel and perpendicular.

Thinking of real world examples, and seeing pictures of them will help the students understand what parallel and perpendicular lines should look like. After they have this initial understanding, they then could get a better grasp of the definitions. Also, they would recognize the importance of following the definitions to correctly construct objects involving parallel and perpendicular lines.

References:

Detwiler, dir. Intro to Parallel and Perpendicular Line. YouTube, 2010. Web. <https://www.youtube.com/watch?v=vnnwfcDcNlY >.

Engaging students: Inverse Functions

In my capstone class for future secondary math teachers, I ask my students to come up with ideas for engaging their students with different topics in the secondary mathematics curriculum. In other words, the point of the assignment was not to devise a full-blown lesson plan on this topic. Instead, I asked my students to think about three different ways of getting their students interested in the topic in the first place.

I plan to share some of the best of these ideas on this blog (after asking my students’ permission, of course).

This student submission again comes from my former student Brittney McCash. Her topic, from Algebra II: multiplying binomials.

green line

C3. How has this topic appeared in the news.

For the engagement on this aspect of my topic, I would bring a binomial cube with me. I would pose the question, “What do we do when we multiply two binomials together?” The students, of course would not know the answer. I would then say, “Well let’s what one man did that they even did a news article about him!” This in itself catches the students attention because they are piqued about what exactly I am talking about. I would then pass out a copy of this news article so that the students could read. After popcorn reading out loud, we would discuss the article and about how we could use the binomial cube. I would then take out my cube (If possible, put students in groups and give each group a binomial cube to work with) and ask the students, “How in the world did he use this cube to multiply those binomials (points to equation on board)?” I would give them the hint that they have to add up the sides of the square and solve for the perimeter, and see what they can come up with. This is a great engagement for the kids because not only is it hands on, but the article brings in outside aspects of what they’re learning so that they realize they are not the only ones having to learn the material. It’s also a great way to introduce multiplying binomials because it starts at the beginning of adding variables (which they already know how to do), and it’s a visual representation of concept that is sometimes hard to grasp. It’s also a great way to lead into the FOIL, Box, etc…methods to take it into a deeper explanation. For those that have not heard of the binomial cube, here are some pictures of what the students will be working out.

ARTICLE: News Article about Binomial Cube

multiplybinomial

green line<!–[if gte mso 9]>

B2. How does this topic extend what your students should have learned in previous courses?

            A great way to start off with this engagement would be to take the students back to sixth grade. Start off with asking students, “Who remembers when we had to learn how to add and subtract fractions?” Most, if not all, of the students should raise their hands. You can then ask, “Okay, good. So does anyone remember what the next step was after we learned how to add and subtract fractions? What did we learn how to do next?” The answer I am looking for here is multiplying and dividing. After that is established, you can lead in with, “Okay, so who can tell me what the next step would be with what we have previously been learning (adding and subtracting binomials)?” The answer is multiplication and division. Make sure to let them know that you will only be focusing on the multiplication aspect for now. Then you can pose some questions like, “What does multiplying binomials look like? How do we do it? Is there more than one way?” You can then go into a deeper exploration of multiplying binomials and the different ways you can do so. This is a good way to introduce multiplying binomials because not only did I bring in one concept students were already familiar with, I brought in two. I utilized something they already knew (even if subconsciously) back in middle school, and applied that same order to something more complex. It showed them that there was a purpose for learning what they did, and why there is a reason we go in the order that we do. Then you have the aspect of taking something they had been previously working on this semester and extending it further. This helps the students connect with what they are learning and realizing there is a purpose. Because multiplication is repeated addition, we are taking something they have previously learned, and extending it further. Another reason this is a good plan is because you start off with such a basic question, that every student knows the answer. This allows for immediate attention because all the students know what you are talking about, the more they understand, the more likely they are to participate in classroom discussion.

green line<!–[if gte mso 9]>

E1. How can technology be used to effectively engage students with this topic?

In multiplying binomials, technology is a wonderful thing. It can allow students the opportunity to learn in new and interesting ways. When thinking of an engage for this topic, I thought of the 9th grade Algebra 1 class I am currently teaching. High School students are sometimes the hardest to keep entertained, and I think I found the perfect video to help keep there attention. This video is a group of students who did a rap about the FOIL method. What better way to relate to students then students themselves! I would start class off by telling the class, “Today we are going to start of by watching a fun video over something we will be learning today.” Proceed to play the video, and observe how every student is watching. The video is fun while also informing. It describes the method, though not thoroughly, but it gives the students an idea of what will be coming. This video helps show that other students all over the state/world are learning the same thing, and are bringing a fun new aspect to the learning of the material. After the video is played, you might ask the class to try and guess at what exactly you will be covering today. It’s always good to see their minds work and try to figure it out. This question also allows them to connect the video back to the classroom environment and settle down. You can then begin your lesson on multiplying binomials. At the end of the lesson, I would bring up the video again, and ask the class if they can recall what FOIL stands for and to give me an example. I would probably make this their exit ticket for the day and have them write it down on a piece of paper. (This video runs a little long, and I would recommend editing some parts out for time sake. )

Resources:

http://www.youtube.com/watch?v=MG-c7NWFS8U

http://www.noozhawk.com/article/santa_barbara_montessori_school_open_house_binomial_cube_20140118

http://montessorimuddle.org/2012/02/02/using-the-binomial-cube-in-algebra/

Engaging students: Inverse Functions

In my capstone class for future secondary math teachers, I ask my students to come up with ideas for engaging their students with different topics in the secondary mathematics curriculum. In other words, the point of the assignment was not to devise a full-blown lesson plan on this topic. Instead, I asked my students to think about three different ways of getting their students interested in the topic in the first place.

I plan to share some of the best of these ideas on this blog (after asking my students’ permission, of course).

This student submission again comes from my former student Allison Myers. Her topic, from Algebra II: inverse functions.

green line

CURRICULUM

How can this topic be used in your students’ future courses in mathematics or science?

Functions are a composition of one or more actions that maps one object onto another (each input maps to one output). Inverse functions are a composition of reverse actions that “undo” the actions of the original function.

Inverse functions have real-world applications, but also students will use this concept in future math classes such as Pre-Calculus, where students will find inverse trigonometric functions. Inverse trigonometric functions have a whole new set of real-world applications, such as finding the angle of elevation of the sun, or anything which models harmonic motion.

Students will also see this concept again in Calculus, where they will differentiate inverse trigonometric functions to solve real-world applications involving rate of angular rotation or the rate of change of angular size.

green lineTECHNOLOGY

How can technology be used to effectively engage students with this topic?

In the past, I taught a lesson where the Explore portion of the lesson utilized dry erase markers and transparency sheets to allow students to discover what happens graphically when computing an inverse (trigonometric) function. My goal was for my students to understand why we compute inverses the way we do. To my horror, my theoretical 15-minute, super insightful Explore became messy, full of problems, and confusing to my students.

While reflecting after the lesson, I began to consider how using technology would have better served my students (in their understanding) and myself (in my goals for the lesson). I found Glencoe’s directions for using the TI-Nspire to compute inverse functions (see image below). Using the TI-Nspire, I would start the lesson with a real-world example and data and have my students complete Step 1. Next, I would explain our need to “undo/reverse” the data, and allow the students to come up with different ways to do so. After that, I would ask the students to make conjectures about possible formulas. Using the TI-Nspire would be less messy and time-consuming (as compared to my experience with markers and transparencies), and would also allow the teacher to be within the context of a real-world problem. I believe if we used this (or similar) technology, combined with the constructivist-style teaching, students would come away with not only a better understanding for computing inverse functions but also their real-world applications.

TIInspireSource: http://glencoe.com/sites/common_assets/mathematics/alg2_2010/other_cal_keystrokes/TI-Nspire/Nspire_423_424_C07L2B_888482.pdf

green lineCULTURE

How has this topic appeared in pop culture (movies, TV, current music, video games, etc.)?

Inverse functions are used every day in real life. For example, when a computer reads a number you type in, it converts the number to binary for internal storage, then it prints the number out again onto the screen that you see – it’s utilizing an inverse function. A basic example involves converting temperature from Fahrenheit to Celsius.

Another example, if one considers music notes on paper to be a function of the sound produced, then the software Sibelius can be considered the inverse function, as it takes a musician’s music and converts it back to music notes.